| |
|
| |
(Small images to the left enlarge when clicked) |
| |
|
| |
Introduction |
- If you've ever tried to install crown or base molding before you have realized that the process is not as straight forward as it appears.
- Because walls in a home do not usually form perfect 90 degree angles it makes crown molding installation more challenging.
- As a result of the nonperfect 90 degree corners, the inside corners of a crown molding installation can show unsightly gaps.
- One way to install crown molding which alleviates the unsightly gaps that result from imperfect corners in a room is to cope the molding.
- This process can be achieved by using a coping saw and a lot of elbow grease, but is a slow process.
- The EasyCoper and BaseCoper are an ingenious solution which makes the coping process a snap.
- The EasyCoper and BaseCoper are made in the USA from a very durable plastic by the EasyCoper Tool Company, Inc. in NC.
- An aluminum EasyCoper is available as well.
|
| |
|
| |
Instructions and Installation |
| |
|
 |
- I received my EasyCoper and BaseCoper hand delivered by the inventor. They were packaged within their own detailed instructions. The instructions consist of two main parts. The first part of the instructions detail how to cut the 45 degree miter that is required before coping. The second set of the instructions detail how to perform the coped cut. Both sets of instructions are very well written and easy to understand.
|
|
|
|
|
 |
- The instructions call for attaching the EasyCoper to your work bench. There are two screw holes that are designed into the EasyCoper which makes this easy. Instead of attaching it directly to your work bench with screws, as I did, you could attach the EasyCoper to the end of a piece of lumber which will also serve to support the molding.
|
| |
|
| |
The Process - EasyCoper |
| |
|
|
|
 |
- Once the 45 degree miter is cut, the first step in the coping process is to "nub off the bottom point of the crown, square at the first angle." This can be done with either a jig saw or a miter saw. I chose to use my miter saw for this in order to achieve a nice 90 degree cut.
|
| |
|
 |
- The second step in the coping process is to place the molding in the jig so that the front of the molding does not extend past the face of the jig. If the molding extends too far past the face of the jig the foot of the jig saw will bump into it as you cut.
- Start with the molding to the right side of the jig as pictured to the left. Start the cut on the left side of the molding using your jig saw. It is important to keep the foot of the jig saw flat against the surface of the jig during the cut.
- It is also important to stop your cut before you get to the end of the molding as you cut from left to right. If you go to far you will end up cutting into the jig. This happened to me during my review, but it does not affect the quality of the jig.
|
| |
|
 |
- After you've made your cut as far as you can go without cutting into the jig, slide the molding to the left side of the jig and complete the cut.
- I found during the course of the review that the process was much easier if the molding was clamped down to the work bench. It is not completely necessary to clamp it down (hand pressure is adequate), but it made the process a little easier.
|
| |
|
 |
|
| |
|
 |
- Close up of the coped cut.
|
| |
|
 |
- Close up of the finished coped crown molding against another piece of molding. The fit was extremely good. If the coped piece of crown molding is rocked either forward of backwards creating angles less than or greater than 90 degrees (as is the case in imperfect walls) the joint stays closed. This would not be possible unless the crown molding was coped.
|
| |
|
| |
The Process - BaseCoper |
 |
- The process for using the BaseCoper is slightly different than the EasyCoper.
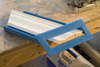
- At first glance the BaseCoper looks flat, but there is a light angle to the jig that causes it to project downward.
|
 |
- The first step in the process is to miter the base molding at a 45 degree angle.
- Instead of attaching the BaseCoper to the work bench as was done for the EasyCoper, the BaseCoper is clamped directly to the base molding.
|
|
|
 |
- The rest of the coping process is the same as above for the EasyCoper.
|
|
|
 |
- Close up of the finished coped base molding against another piece of molding. Again, as was the case for the EasyCoper, the BaseCoper helped to produce a very tight fitting joint.
|
| |
|
| |
The Bottom Line |
| |
- The above process for creating coped crown molding and coped base molding was painless. It is definitely faster than using a coping saw by hand. Like any new tool or jig, it takes a little practice in order to master them. It took me four attempts before I was able to cope the crown molding for a good fit.
|
| |
- Does GarageWoodworks recommend the EasyCoper and BaseCoper? Absolutely. If you are going to be installing crown molding or base molding these two jigs are a must have. They will definitely save you time.
|
|
|


